
How to Organize OBS Recordings Using Filename Formatting Variables
How to Organize OBS Recordings Using Filename Formatting Variables
Creating a well-organized content library is essential for any creator. This guide shows how to use OBS Studio, the Source Recorder plugin, and the Branch Output plugin to set up variable paths and filenames. By automatically sorting recordings into folders by month and year and naming files with detailed timestamps, you can streamline your workflow and simplify editing for platforms like YouTube.
Why Organization Matters
- Save Time: Quickly locate specific recordings without hunting through cluttered directories.
- Stay Consistent: Maintain a standardized file naming and folder structure for all projects.
- Streamline Editing: Easily identify files by resolution, frame rate, and time for post-production.
Setting Up Your Recording Path and Folder
1. Define the Recording Path
- Open OBS Studio.
- Navigate to Settings > Output > Recording.
- Set your Recording Path to a main folder (e.g.,
C:\Recordings\OBS\).
This folder will serve as the root directory for your recordings.
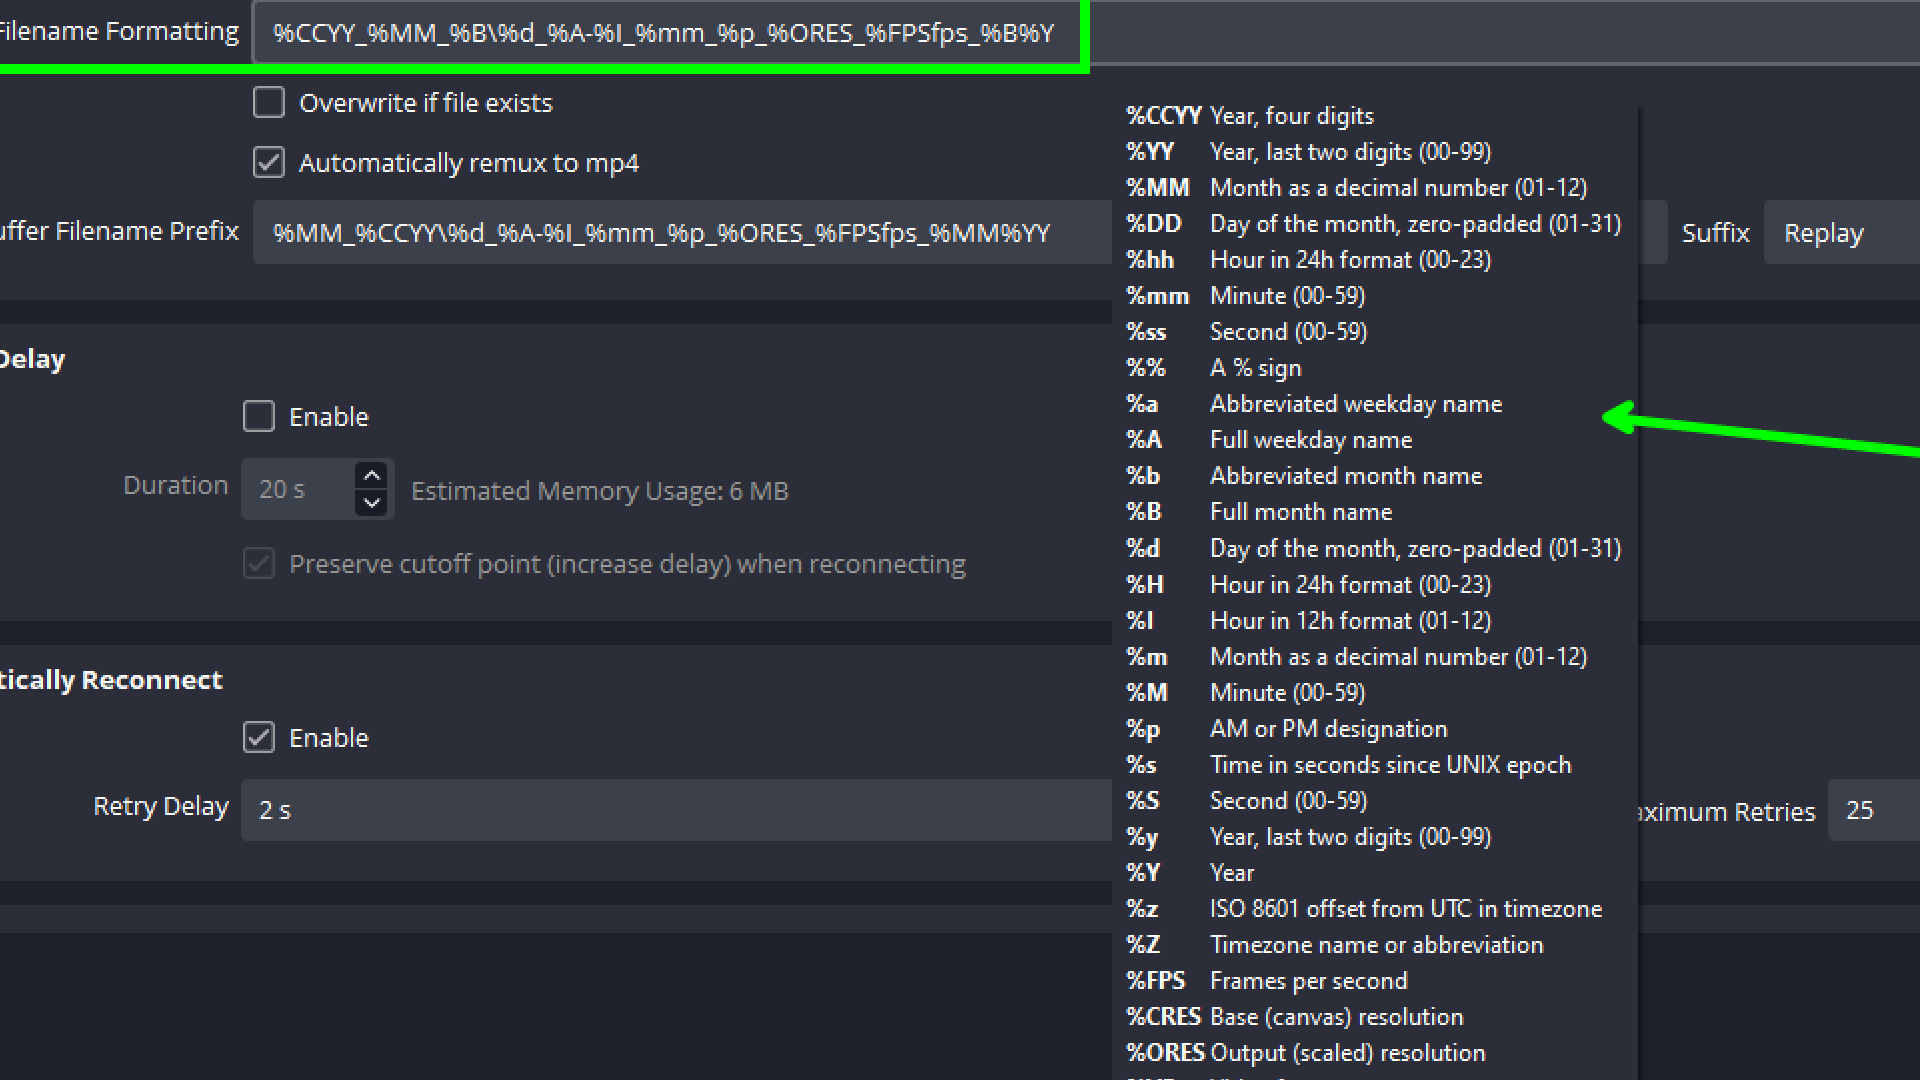
Configuring Filename Formatting Variables
OBS Studio supports variables to automatically generate filenames. For instance, %CCYY for the year or %ORES for the output resolution. Use these to create a structured naming system.
3. Create Folder Names by Date
Set the first part of the Filename Formatting to:
%CCYY_%MM_%B
This creates folders like 2024_11_November.
2. Customize File Names
Navigate to Settings > Advanced > Recording and set Filename Formatting to:
%d_%A-%I_%mm_%p_%ORES_%FPSfps_%B%Y
This will create filenames like: 23_Saturday-11_39_AM_1920x1080_30fps_November2024.mp4
4. Combine Folder and Filename
In order to use the folder name and filename together you can use the simply join them together with a backslash like this:
%CCYY_%MM_%B\%d_%A-%I_%mm_%p_%ORES_%FPSfps_%B%Y
Now you will have a structure like this:
C:\Recordings\OBS\2024_11_November\23_Saturday-11_39_AM_1920x1080_30fps_November2024.mp4
Save Individual Recordings of each source
Take this one step further by using the Source Recorder or Branch Output plugins to save individual recordings of each source. This will allow you to have a recording for each source in the same folder structure, for example a separate recording for your camera and your screen. In multiple camera setups this will allow you to keep the recordings organized by date and time and camera name for easier editing.
Why Use Source Recorder or Branch Output?
Both plugins enhance the default recording capabilities of OBS Studio:
- Source Recorder: Ideal for recording individual sources, such as specific cameras or screen captures.
- Branch Output: Offers advanced capabilities, including support for multiple sources, custom variables, and improved filename formatting.
Both tools help you automatically organize recordings with folders and filenames based on detailed metadata.
Setting Up Source Recorder
1. Install Source Recorder
- Download the Source Recorder plugin from the OBS Forum.
- Extract the files and place them in your OBS Studio installation directory.
- Restart OBS Studio.
2. Configure Source Recorder
- Open OBS Studio.
- Right-click a source (e.g., your camera feed) in the Sources list and select Filters.
- Click the + button and add the Source Record filter.
- Configure the Recording Path to:
- C:\Recordings\OBS\
- Set the Filename Formatting to:
CCYY_%MM_%B%d_%A-%I_%mm_%p_%ORES_%FPSfps_%SOURCE_NAME
3. Save Source-Specific Recordings
The plugin creates individual recordings for each source with descriptive filenames, such as:
2024_11_November\23_Saturday-11_39_AM_1920x1080_30fps_Camera1.mp4
Setting Up Branch Output
1. Install Branch Output
- Download the Branch Output plugin from GitHub.
- Follow the installation instructions to add the plugin to OBS Studio.
2. Configure Branch Output
- Open OBS Studio.
- Navigate to Settings > Output > Recording.
- Under Branch Output, configure the Recording Path to:
C:\Recordings\OBS
4. Set the Filename Formatting to:
%CCYY_%MM_%B%d_%A-%I_%mm_%p_%ORES_%FPSfps_%SOURCE_NAME
Branch Output organizes files similarly to Source Recorder but offers enhanced features for multi-source setups.
Full List of Variables
Here is the complete list of variables you can use for filename formatting:
Date and Time Variables
%CCYY: Year (4 digits, e.g., 2024)%YY: Year (last two digits, e.g., 24)%MM: Month (01–12)%DD: Day of the month (01–31)%hh: Hour (24-hour format, 00–23)%mm: Minute (00–59)%ss: Second (00–59)%a: Abbreviated weekday name (e.g., Mon)%A: Full weekday name (e.g., Monday)%b: Abbreviated month name (e.g., Jan)%B: Full month name (e.g., January)%I: Hour (12-hour format, 01–12)%p: AM/PM designation
OBS Metadata Variables
%ORES: Output resolution (e.g., 1920x1080)%FPS: Frames per second (e.g., 30fps)%CRES: Base (canvas) resolution (e.g., 3840x2160)%VF: Video format (e.g., mp4)%SOURCE_NAME: Source name for the recording%SCENE_NAME: Active scene name during recording
Advanced Variables
%RAND: Random number%UUID: Universally unique identifier%INDEX: Auto-incremented number for recordings%TICK: Time in milliseconds since UNIX epoch%TZ: Timezone offset from UTC
Example Workflow
Folder Structure
With the above configuration, your recordings will automatically be organized like this:
C:\Recordings\OBS\2024_11_November
├── 23_Saturday-11_39_AM_1920x1080_30fps_Camera1.mp4 ├── 23_Saturday-11_45_AM_1280x720_60fps_ScreenCapture.mp4
Multi-Camera Setup
- Apply the Source Recorder filter to each camera source.
- Assign unique filenames with
%SOURCE_NAMEfor differentiation. - Files are saved as:
23_Saturday-11_39_AM_1920x1080_30fps_Camera1.mp423_Saturday-11_39_AM_1920x1080_30fps_Camera2.mp4
Benefits of Organized Recordings
- Efficiency: Quickly locate files with consistent folder and filename structures.
- Editing Simplicity: Instantly identify recordings by resolution and source.
- Scalability: Handle large volumes of content effortlessly.
- Professionalism: Maintain a polished workflow ready for editors or collaborators.
Video Tutorial
Learn more by watching this video guide:
Advanced Tips
- Custom Variables: Use
%UUIDfor unique file identifiers in collaborative projects. - Integration with Editors: Combine
%ORESand%FPSto quickly find files with specific resolutions and frame rates. - Source-Based Recording: Separate files by input source, ideal for multi-camera setups.
Take your content creation to the next level with organized recordings. Try out Source Recorder or Branch Output today and enjoy a streamlined workflow!
Related Posts

Create Interactive UI: Verse Fields Events Now Available in UMG
Learn how to create UI widgets that trigger events in Verse using the new Verse fields event type in UMG.

BizaNator
Obs did not shutdown properly?!
Fixing OBS shutdown popup, do you want to run in safe mode, NO I don't want you to ask me again!

BizaNator
Verse Function Renaming: The Art of Clean Code Through Smart Aliases
A comprehensive, humor-filled guide to function renaming in Verse, complete with backward compatibility tricks and practical solutions.